I recently acquired a Surface Pro 4 and it was instantly obvious what a great machine it is. Having a tablet for casual use, while still having the capabilities of a powerful computer that you can use with a normal keyboard and mouse is extremely convenient.
One of the first things that I wondered when I got the Surface was: how well will this thing run Linux? I can accept having to use Windows when I’m casually using the machine as a tablet, but when I really want to get work done, I am most comfortable in Linux. There were some difficulties at the beginning of installation, but once I was able to get started, installing Linux on the Surface was as easy as installing it on a regular laptop.
{:.no_toc}
- TOC will be output here {:toc}
Prepare The System Link to heading
If you plan on keeping Windows around, the C drive must be shrunk to make room for Linux. Otherwise, you can skip to booting to install media. Even if you don’t plan on using Windows, currently the only way to get firmware updates is through Microsoft. If only just for updates, you may want to keep a small Windows partition.
Disk Management Link to heading
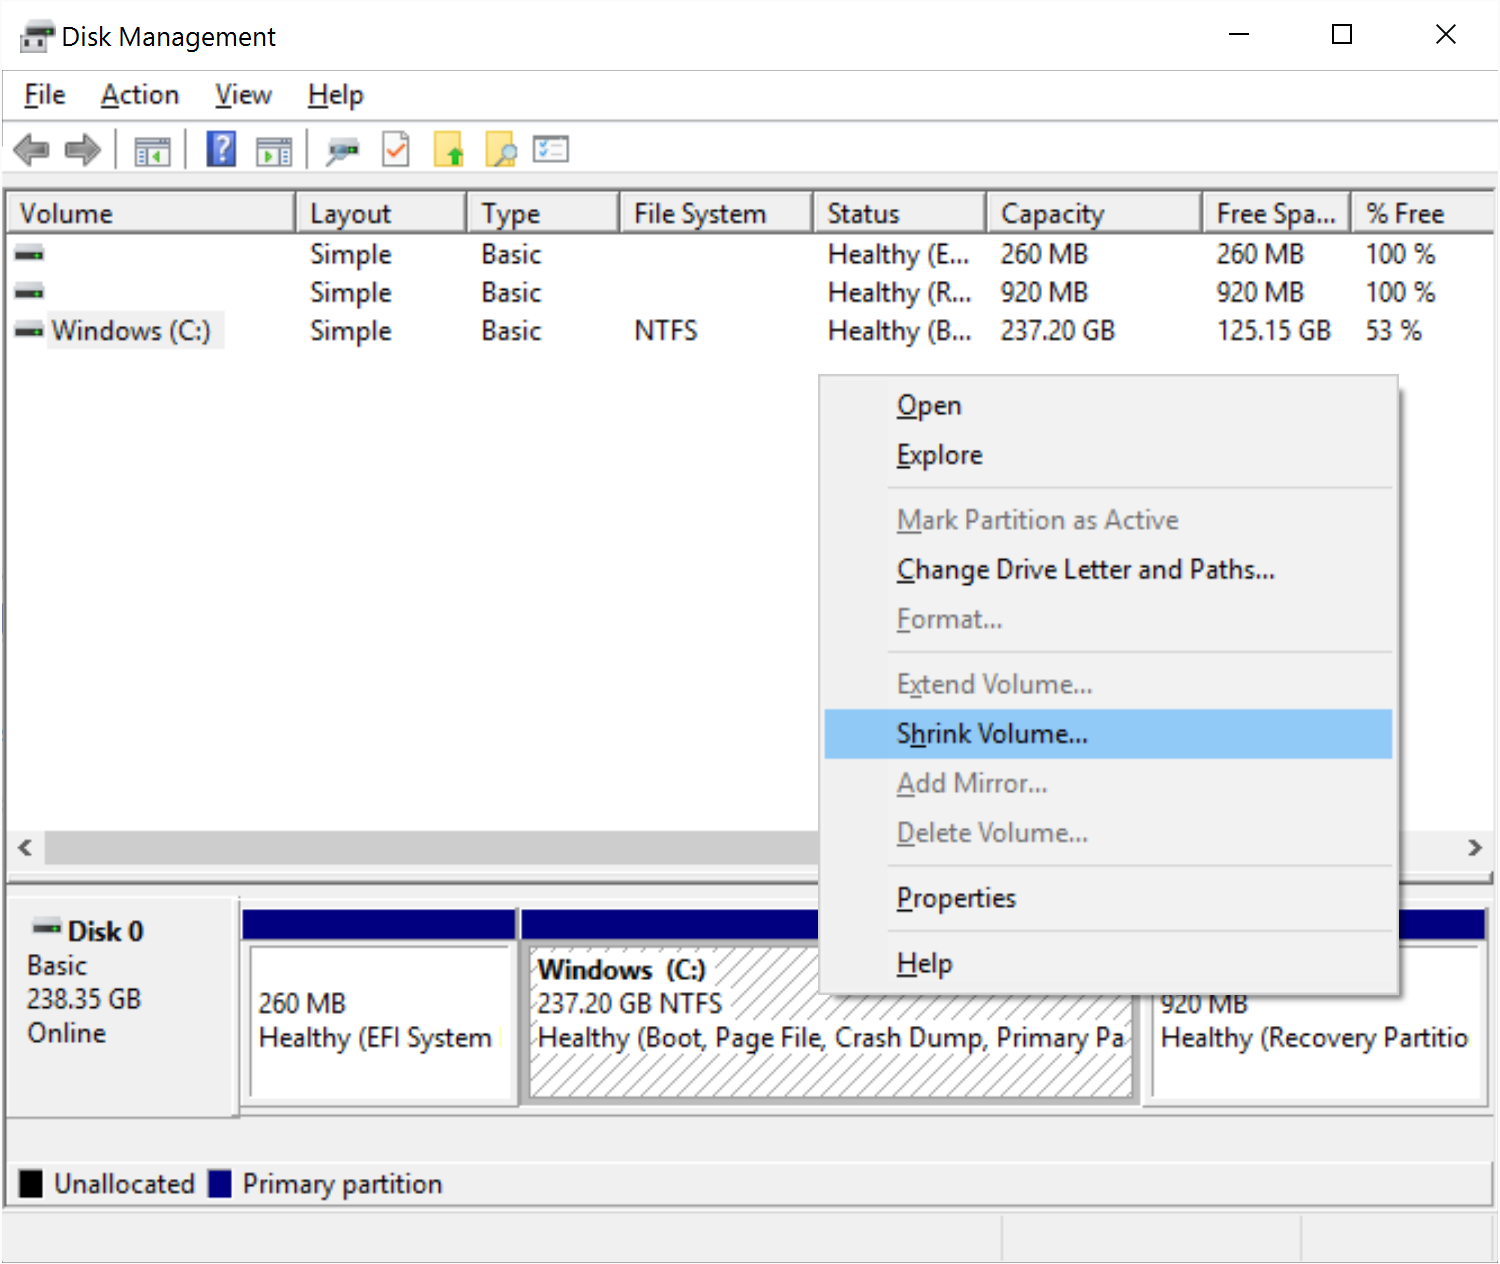
Open the Control Panel and go to System and Security->Administrative Tools->Computer Management, then click on Storage, and finally Disk Management.
Select the main desk and choose to shrink the partition.
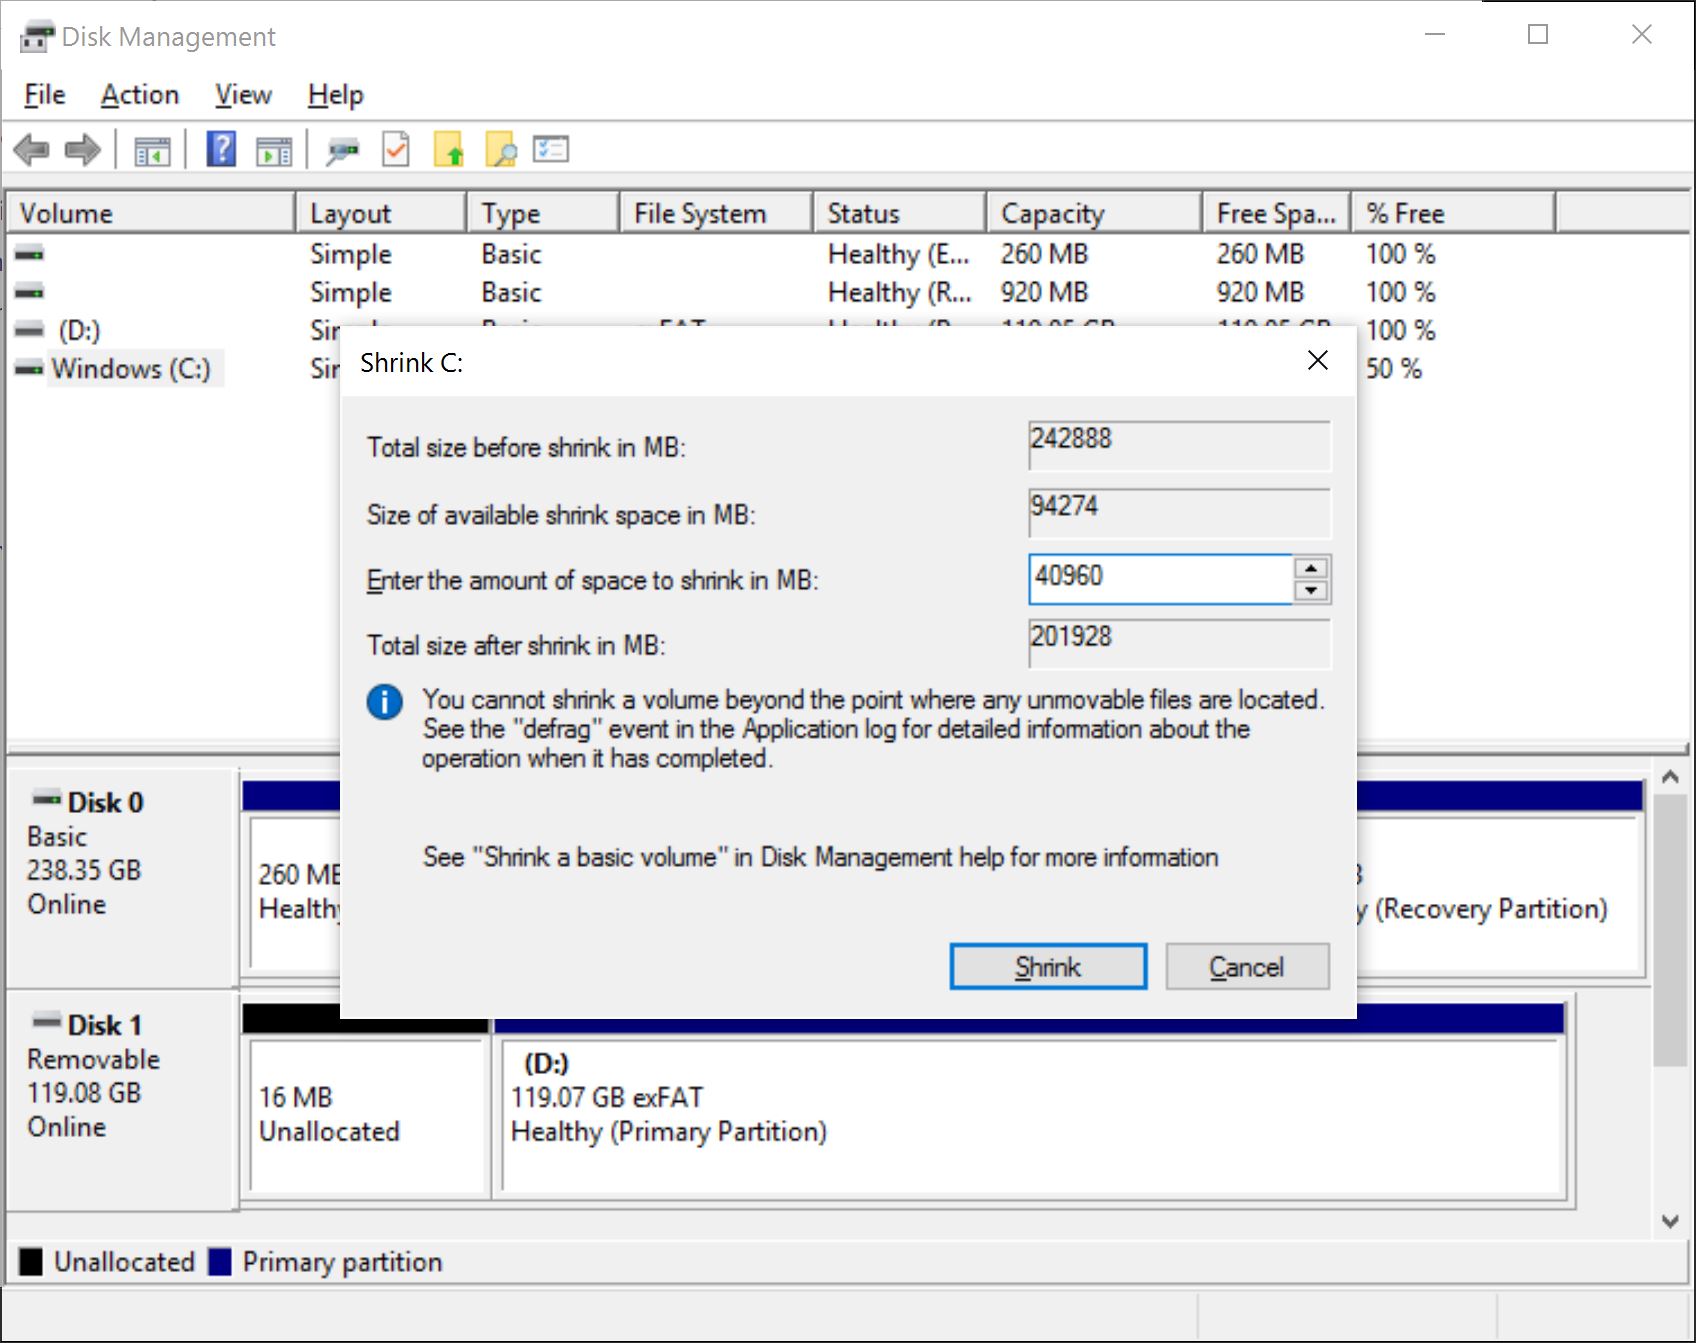
I chose to only partition off a 40GiB chunk.
After shrinking the disk you should see an unallocated space showing the size of your new unformatted partition.
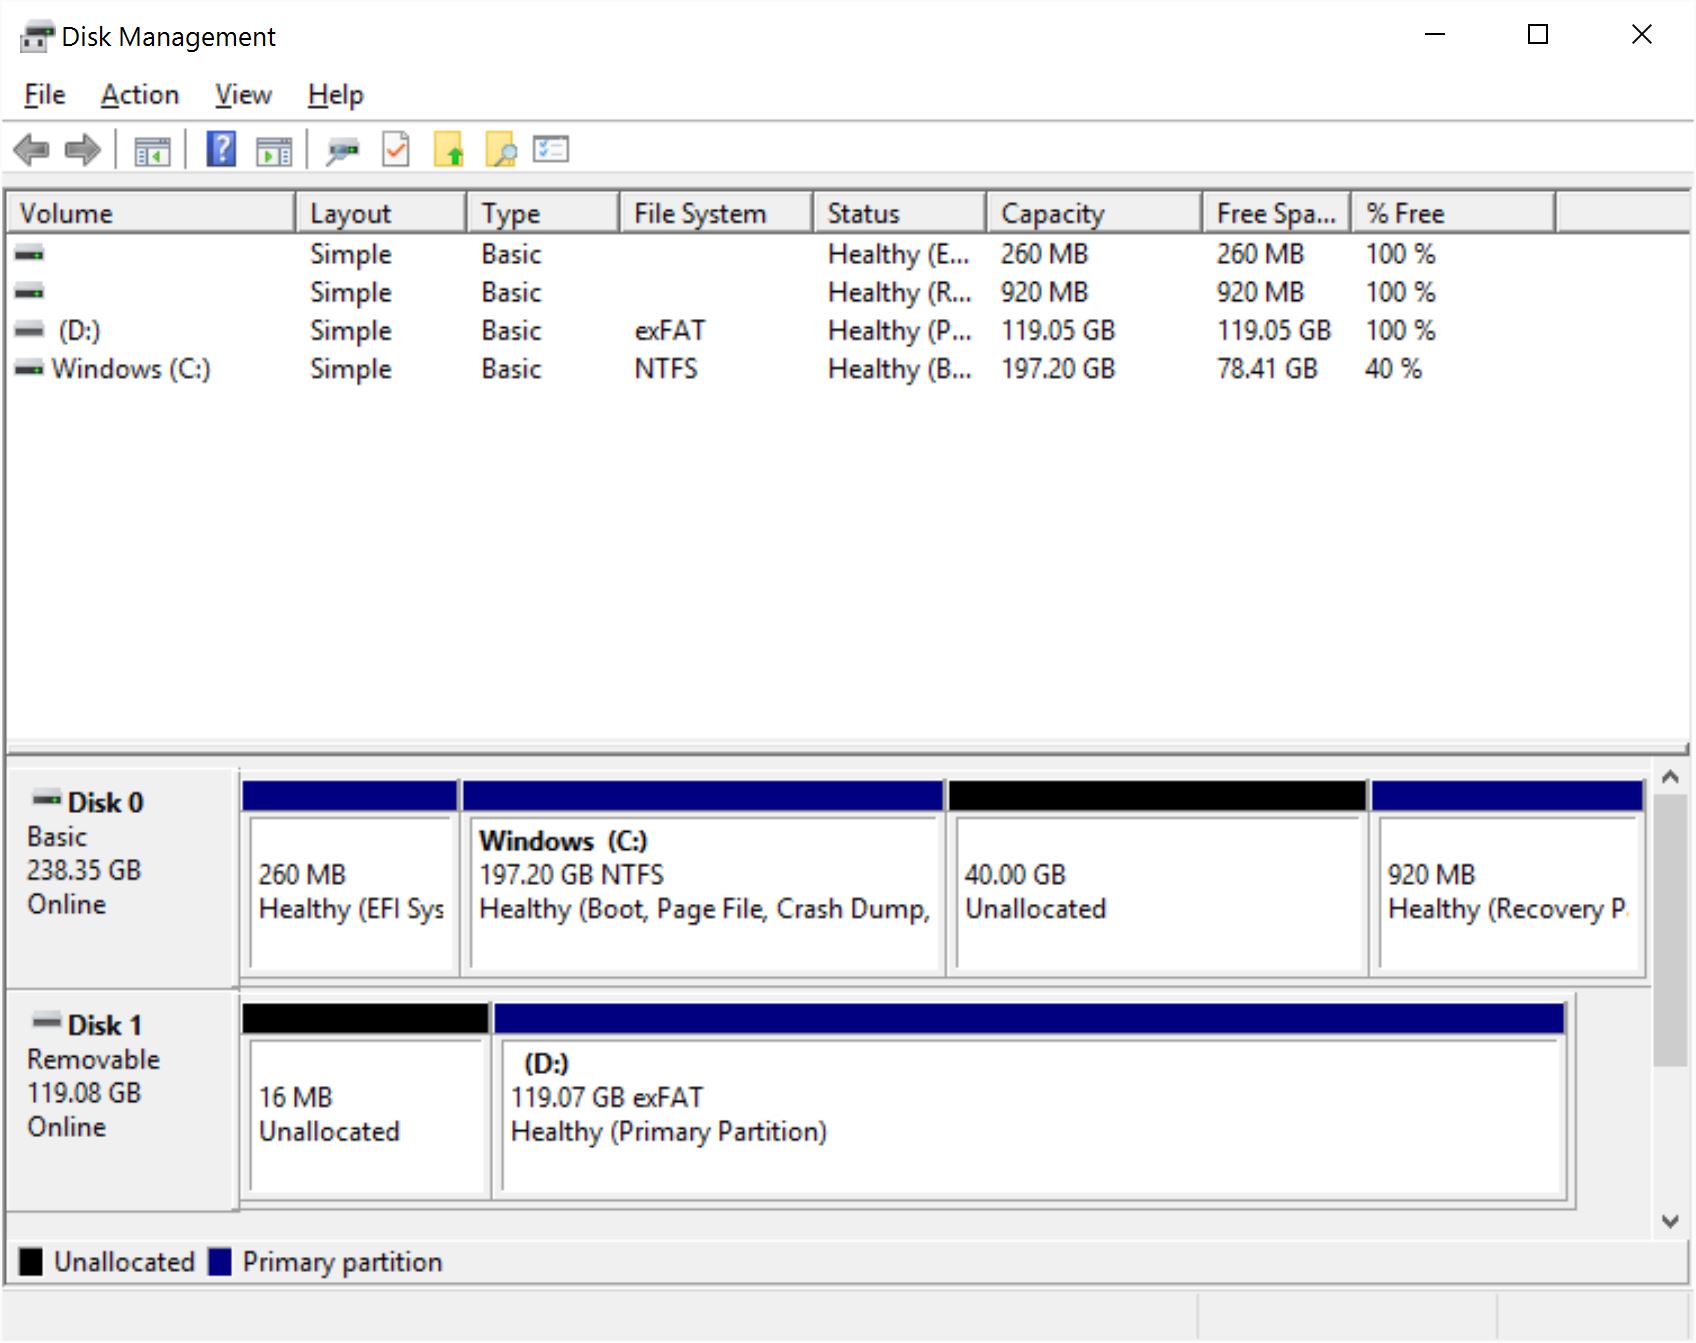
Alternatively, if you don’t plan on keeping Windows around, the drive can be wiped later within the Arch install media.
Delete Recovery Partition (optional) Link to heading
While playing with the partitions, you may want to delete the Windows recovery partition. It takes up unnecessary space, and you’re worried about not having it you can back it up to USB key.
Booting Link to heading
When booting from install media, and eventually when booting your own install, you have to decide if you want to leave secure boot enabled.
UEFI Menu Link to heading
To change around the secure boot options, you need to be able to access the UEFI menu.
Instructions to access the UEFI menu:
- Turn off the computer.
- With the computer off hold down the volume up button.
- While still holding the volume up button, turn on the computer.
- Keep holding the volume up button until the surface logo disappears.
Secure Boot Options Link to heading
This section will go through the different options with secure boot..
Option 1: Disable Secure Boot Link to heading
The simplest option at this stage is to boot into the UEFI menu, and disable secure boot. Unfortunately, when booting with secure boot disabled, you’ll be faced with a nice big red bar at the top when it gets to the Surface logo. If you are fine with that this is the easiest option.
In the UEFI menu under security, you’ll find secure boot. The following options are available:
- Microsoft Only
- Microsoft and 3rd Party CA
- None
Select ’none’ to turn off secure boot.
Option 2: Use a Signed Bootloader Link to heading
The archiso has a signed bootloader which is supposed to allow booting with secure boot enabled. I was unable to boot using this method but the process is detailed on the arch wiki.
Option 3: Use Your Own Self-Signed Keys Link to heading
The last option is using your own set of self signed keys. This process is also detailed on the arch wiki and there is a very good resource all about secure boot that goes into detail on the process – Rod Smith’s Controlling Secure Boot.
Change Boot Options Link to heading
Next you’re going to want to change the boot options to prioritize USB, or whatever media you are booting from.
Open the UEFI menu and select “Configure Alternate System Boot Order”, Drag whichever option you want to boot from to the top.
You should now be able to stick in a USB drive and boot from it, installing Linux as usual.
Booting from SD Card or Difficult Media Link to heading
I ran into an issue where I could not get certain USB key images to boot. I was also unable to get the images to boot from an SD card. For whatever reason, if you’re having trouble booting an image the normal way, you may want to try installing an alternate bootloader and using it to boot your install media. When I did this, I was able to boot any image, from any device.
I installed the rEFInd bootloader to Windows’ existing boot partition, and changed some settings so that instead of running Windows’ regular bootloader at startup, rEFInd would be run. From rEFInd I could boot from difficult ISO images. This was especially useful because if you just stick a USB key in the Surface and boot from it, you cannot have a keyboard plugged in. In my case wireless was also not working and I was unable to ssh in to the box. To get around this I booted from an SD card, plugged a USB ethernet adapter in, and I was then able to ssh in. Alternately, this also lets you plug in a keyboard and do the installation directly on the device.
Download the bootloader and extract it to a known directory within Windows. Make sure to get the binary zip file.
Setting Up rEFInd as a Bootloader Link to heading
To setup rEFInd as a bootloader, I opened up the command prompt within Windows and installed rEFInd to Windows existing system partition.
Note: This will NOT remove Windows’ existing bootloader, it will use rEFInd instead. rEFInd can simply be deleted at any time and Windows can be set back to using the original bootloader.
Open the cmd prompt as an administrator.
Mount the system partition to drive ‘Z:’
C:\Windows\system32> mountvol Z: /SChange directory to wherever rEFInd has been extracted.
C:\Windows\system32> cd C:\Users\John\DownloadsCopy rEFInd to the system partition.
C:\Users\John\Downloads> xcopy /E refind Z:\EFI\refind\Change directory to the system partition.
C:\Users\John\Downloads> Z:Rename the configuration file
Z:> rename refind.conf-sample refind.confSet rEFInd as the default EFI boot program. If this doesn’t work try step 8.
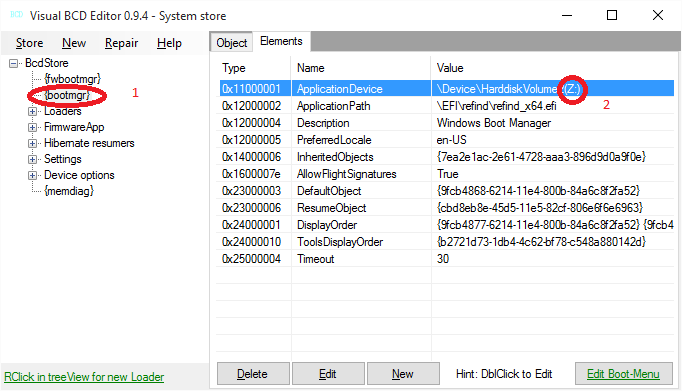
Z:> bcdedit /set {bootmgr} path \EFI\refind\refind_x64.efiIf the previous step does not work, you may be able to go in and edit the BCD with other tools. You can use the Visual BCD Editor, which will let you change the ApplicationPath element.
Installation Link to heading
Once booted into the Linux installer, the process should be fairly similar to a regular install.
Formatting Link to heading
I decided to use ZFS as my file system using a single pool for ‘root’, which I put on a 40GB partition on the SSD. I then used a separate pool for ‘/home’ that I put on a micro SD card. I won’t be going into detail about my reasoning for how I considered ZFS, if you’re looking for an explanation about how to set it up, and why I did what I did, I describe how to set up ZFS on Arch Linux in detail in previous posts.
Besides the fact that I used ZFS, this process should be very similar with any other file system.
This is what the discs look like on the Surface. As you can see I’m currently booted off the micro SD card which is showing up as /dev/sda. The SSD is showing up as /dev/nvme0n1, and is only using about 200GB of space leaving 40GB unpartitioned, which I will use for the root file system.
[root@archiso /]# lsblk
NAME        MAJ:MIN RM   SIZE RO TYPE MOUNTPOINT
sda           8:0    1 119.1G  0 disk
└─sda1        8:1    1 119.1G  0 part /run/archiso/bootmnt
loop0         7:0    0   330M  1 loop /run/archiso/sfs/airootfs
nvme0n1     259:0    0 238.5G  0 disk
├─nvme0n1p1 259:1    0   260M  0 part
├─nvme0n1p2 259:2    0   128M  0 part
└─nvme0n1p3 259:3    0 197.2G  0 part
Using my partitioning tool of choice gdisk, I open up the SSD and make a new ‘Solaris root’ partition.
[root@archiso /]# gdisk /dev/nvme0n1
GPT fdisk (gdisk) version 1.0.1

Found valid GPT with protective MBR; using GPT.
Command (? for help): p
Disk /dev/nvme0n1: 500118192 sectors, 238.5 GiB
Logical sector size: 512 bytes
Disk identifier (GUID): 904273B8-CE67-42A3-AB13-35EFC6772FB3
Partition table holds up to 128 entries
First usable sector is 34, last usable sector is 500118158
Partitions will be aligned on 2048-sector boundaries
Total free space is 85774957 sectors (40.9 GiB)

Number  Start (sector)    End (sector)  Size       Code  Name
   1            2048          534527   260.0 MiB   EF00  EF
   2          534528          796671   128.0 MiB   0C01  Mi
   3          796672       414345215   197.2 GiB   0700  Ba

Command (? for help): n
Partition number (4-128, default 4):
First sector (34-500118158, default = 414345216) or {+-}size{KMGTP}:
Last sector (414345216-500118158, default = 500118158) or {+-}size{KMGTP}:
Current type is 'Linux filesystem'
Hex code or GUID (L to show codes, Enter = 8300): bf00
Changed type of partition to 'Solaris root'

Command (? for help): w

Final checks complete. About to write GPT data. THIS WILL OVERWRITE EXISTING
PARTITIONS!!

Do you want to proceed? (Y/N): Y
OK; writing new GUID partition table (GPT) to /dev/nvme0n1.
The operation has completed successfully.
Setup the Root Pool Link to heading
I then proceeded to set up my root pool. If I were not using ZFS, this step would simply be replaced with formatting the partitions using a different file system.
First I got the disk ID for the partition I will be installing my pool on. It shows up as /dev/disk/by-id/nvme-eui.002538415b108e66-part4.
[root@archiso /]# ls /dev/disk/by-id/
nvme-eui.002538415b108e66
nvme-eui.002538415b108e66-part1
nvme-eui.002538415b108e66-part2
nvme-eui.002538415b108e66-part3
nvme-eui.002538415b108e66-part4
usb-Generic-_USB3.0_CRW_-SD_201509231639-0:0
usb-Generic-_USB3.0_CRW_-SD_201509231639-0:0-part1
Create a new zpool ‘vault’.
[root@archiso /]# zpool create -f -o ashift=12 \
                                 vault nvme-eui.002538415b108e66-part4
[root@archiso /]# zpool status
  pool: vault
 state: ONLINE
  scan: none requested
config:

	NAME                               STATE     READ WRITE CKSUM
	vault                              ONLINE       0     0     0
	  nvme-eui.002538415b108e66-part4  ONLINE       0     0     0

errors: No known data errors
Set pool properties.
[root]# zfs set compression=on vault
[root]# zfs set atime=on vault
[root]# zfs set relatime=on vault
[root]# zfs set mountpoint=none vault
Set up datasets for ‘/’, ‘/usr’, ‘/var’, and ‘/tmp’.
[root@archiso /]# zfs create -o mountpoint=none vault/ROOT
[root@archiso /]# zfs create -o mountpoint=legacy vault/ROOT/default
[root@archiso /]# zfs create -o setuid=off -o devices=off -o sync=disabled -o mountpoint=/tmp vault/tmp
cannot mount '/tmp': directory is not empty
filesystem successfully created, but not mounted
[root@archiso /]# zfs create -o xattr=sa -o mountpoint=legacy vault/var
[root@archiso /]# zfs create -o mountpoint=legacy vault/usr
Mask tmpfs backed tmp.
1 [root@archiso /]# systemctl mask tmp.mount
Created symlink /etc/systemd/system/tmp.mount → /dev/null.
Unmount and export the pool, setup the fstab, and set the boot dataset.
[root@archiso /]# zfs umount -a
[root@archiso /]# nano /etc/fstab
[root@archiso /]# zpool set bootfs=vault/ROOT/default vault
[root@archiso /]# zpool export vault
Import the pool at ‘/mnt’ and copy in the cache.
[root@archiso /]# zpool import -d /dev/disk/by-id -R /mnt vault
[root@archiso /]# umount /mnt/vault
[root@archiso /]# mount -t zfs vault/ROOT/default /mnt
1 [root@archiso /]# mkdir -p /mnt/etc/zfs/
[root@archiso /]# cp /etc/zfs/zpool.cache /mnt/etc/zfs/zpool.cache
Make the mountpoints and mount the boot partition. I decided to share the existing Windows boot partition.
[root@archiso /]# mkdir /mnt/{home,boot,var,usr,tmp}
[root@archiso /]# mount /dev/nvme0n1p1 /mnt/boot
Set ‘tmp’ to be a legacy dataset so that it can be mounted. I set this back later. I then proceeded to mount all of the datasets.
2 [root@archiso /]# zfs set mountpoint=legacy vault/tmp
[root@archiso /]# mount -t zfs vault/tmp /mnt/tmp
[root@archiso /]# mount -t zfs vault/var /mnt/var
[root@archiso /]# mount -t zfs vault/usr /mnt/usr
Setup the fstab.
[root@archiso /]# genfstab -U -p /mnt >> /mnt/etc/fstab
[root@archiso /]# nano /mnt/etc/fstab
Edit the mirrorlist and bootstrap the system.
[root@archiso /]# nano /etc/pacman.d/mirrorlist
[root@archiso /]# pacstrap -i /mnt base base-devel
Edit hooks
[root@archiso /]# nano /mnt/etc/mkinitcpio.conf
# ...
HOOKS="base udev autodetect modconf block keyboard zfs usr filesystems shutdown"
# ...
Enter chroot Link to heading
Finally I found myself at the main install step. From here on out the steps are fairly similar on any system.
Enter the chroot
[root@archiso /]# arch-chroot /mnt /bin/bash
Archzfs Repository Link to heading
Since I’m using the archzfs repo I need to add the server to pacman.conf.
[root@archiso ~]# nano /etc/pacman.conf
# REPOSITORIES
[archzfs]
Server = http://archzfs.com/$repo/x86_64

# Other repositories...
[root@archiso ~]# pacman-key -r 5E1ABF240EE7A126
gpg: key 5E1ABF240EE7A126: public key "Jesus Alvarez <jeezusjr@gmail.com>" imported
gpg: Total number processed: 1
gpg:               imported: 1
==> Updating trust database...
gpg: next trustdb check due at 2016-10-19
[root@archiso ~]# pacman-key --lsign-key 5E1ABF240EE7A126
  -> Locally signing key 5E1ABF240EE7A126...
==> Updating trust database...
gpg: marginals needed: 3  completes needed: 1  trust model: pgp
gpg: depth: 0  valid:   1  signed:   7  trust: 0-, 0q, 0n, 0m, 0f, 1u
gpg: depth: 1  valid:   7  signed:  67  trust: 1-, 0q, 0n, 6m, 0f, 0u
gpg: depth: 2  valid:  67  signed:   7  trust: 67-, 0q, 0n, 0m, 0f, 0u
gpg: next trustdb check due at 2016-10-19
Update the repositories
[root@archiso ~]# pacman -Syyu
[root@archiso ~]# pacman -S  zfs-linux
Bootloader Link to heading
Setup the bootloader. I use systemd-boot for it’s simplicity (formerly gummiboot).
[root@archiso ~]# bootctl --path=/boot install
[root@archiso ~]# pacman -S intel-ucode
[root@archiso ~]# nano /boot/loader/entries/arch.conf
[root@archiso ~]# nano /boot/loader/loader.conf
title     Arch Linux
linux     /vmlinuz-linux
initrd		/intel-ucode.img
options   zfs=vault/ROOT/default rw
[root@archiso ~]# nano /boot/loader/entries/arch.conf
I also added an entry to boot back to Windows
Find the UUID for Windows.
[root]# blkid
/dev/nvme0n1: LABEL="vault" UUID="427324970059401446" UUID_SUB="6036059601541096496" TYPE="zfs_member" PTUUID="904273b8-ce67-42a3-ab13-35efc6772fb3" PTTYPE="gpt"
/dev/nvme0n1p1: LABEL="SYSTEM" UUID="1A20-9B51" TYPE="vfat" PARTLABEL="EF" PARTUUID="08632d56-2dcf-4798-832d-47a55c6af4e9"
/dev/nvme0n1p3: LABEL="Windows" UUID="A6EC3AE6EC3AB103" TYPE="ntfs" PARTLABEL="Ba" PARTUUID="1f00bed2-bfb7-48b9-95f2-5dba2cfb1552"
/dev/nvme0n1p4: LABEL="vault" UUID="427324970059401446" UUID_SUB="6036059601541096496" TYPE="zfs_member" PARTLABEL="Solaris root" PARTUUID="c33beba4-c30b-4f9d-b6d7-007999f93374"
/dev/nvme0n1p2: PARTLABEL="Mi" PARTUUID="f2d9397d-8988-4371-a221-1fb48af17ef5"
/dev/sda1: LABEL="shard" UUID="1357983430707090525" UUID_SUB="12710706323195723640" TYPE="zfs_member" PARTLABEL="zfs-f3ab621862d13b4a" PARTUUID="276229ef-0856-0a44-a92e-6115378e4e51"
/dev/sda9: PARTUUID="cafec46c-c234-d744-a4ea-7eefe3544ea2"
Add a boot entry.
[root@archiso ~]# nano /boot/loader/entries/windows.conf
title		Blade (Windows)
efi		/EFI/Microsoft/Boot/bootmgfw.efi
options		root=PARTUUID=1f00bed2-bfb7-48b9-95f2-5dba2cfb1552 rw
Set default
[root@archiso ~]# nano /boot/loader/loader.conf
default  arch
timeout  2
Timezone Link to heading
Setup timezones and locales.
[root@archiso ~]# nano /etc/locale.gen
[root@archiso ~]# locale-gen
Generating locales...
  en_US.UTF-8... done
Generation complete.
[root@archiso ~]# nano /etc/locale.conf
[root@archiso ~]# ln -s /usr/share/zoneinfo/America/Los_Angeles /etc/localtime
[root@archiso ~]# hwclock --systohc --utc
[root@archiso ~]#  mkinitcpio -p linux
[root@archiso /]# nano /etc/hostname
[root@archiso /]# nano /etc/hosts
Networking Link to heading
I like to use netctl for internet access. Once profiles are setup it allows seamless switching between interfaces such as wired and wireless. It will also automatically connect to the internet when an ethernet cable is plugged in.
netctl comes with Arch, but in order to use wireless and have ethernet automatically respond to a cable being plugged in you will need a few packages.
[root@archiso /]# pacman -S ifplugd wpa_actiond
Get interfaces.
[root@archiso /]# ip addr
1: lo: <LOOPBACK,UP,LOWER_UP> mtu 65536 qdisc noqueue state UNKNOWN group default qlen 1
    link/loopback 00:00:00:00:00:00 brd 00:00:00:00:00:00
    inet 127.0.0.1/8 scope host lo
       valid_lft forever preferred_lft forever
    inet6 ::1/128 scope host
       valid_lft forever preferred_lft forever
2: enp0s20f0u1u4c2: <BROADCAST,MULTICAST,UP,LOWER_UP> mtu 1500 qdisc fq_codel state UNKNOWN group default qlen 1000
    link/ether 60:45:bd:f9:c8:03 brd ff:ff:ff:ff:ff:ff
    inet 192.168.0.6/24 brd 192.168.0.255 scope global enp0s20f0u1u4c2
       valid_lft forever preferred_lft forever
    inet6 fe80::61e7:426b:5e50:9ae7/64 scope link
       valid_lft forever preferred_lft forever
3: wlp2s0: <BROADCAST,MULTICAST> mtu 1500 qdisc noop state DOWN group default qlen 1000
    link/ether b4:ae:2b:e0:fb:35 brd ff:ff:ff:ff:ff:ff
Set up an Ethernet profile
[root@archiso /]# cp /etc/netctl/examples/ethernet-dhcp /etc/netctl/ethernet-dhcp-profile
[root@archiso /]# nano /etc/netctl/ethernet-dhcp-profile
# nano 2.6.2         File: /etc/netctl/ethernet-dhcp-profile          Modified

Description='A basic dhcp ethernet connection'
Interface=enp0s20f0u1u4c2
Connection=ethernet
IP=dhcp
Enable the wired profile.
[root@archiso /]# netctl enable ethernet-dhcp-profile
ln -s '/etc/systemd/system/netctl@ethernet\x2ddhcp\x2dprofile.service' '/etc/systemd/system/multi-user.target.wants/netctl@ethernet\x2ddhcp\x2dprofile.service'
I wasn’t able to get wireless working in the live installer so I set up ethernet leaving Wireless for later.
Finishing Tasks Link to heading
So that I can access the Surface after installation, I setup ssh and added an account.
[root@archiso /]# pacman -S openssh
[root@archiso /]# passwd
[root@archiso /]# pacman -S zsh sudo
[root@archiso /]# useradd -m -G wheel -s /usr/bin/zsh john
[root@archiso /]# passwd john
[root@archiso /]# EDITOR=nano visudo
[root@archiso /]# nano /etc/pacman.conf
[root@archiso /]# systemctl enable sshd
[root@archiso /]# nano /etc/ssh/sshd_config
Set ‘/tmp’ back to zfs mounted
[root@archiso /]# zfs set mountpoint=/tmp vault/tmp
Finally the partitions can be unmounted, and the pool exported.
[root@archiso /]# exit
[root@archiso /]# umount /mnt/boot
[root@archiso /]# umount /mnt/usr
[root@archiso /]# umount /mnt/var
[root@archiso /]# zfs umount -a
[root@archiso /]# zpool export vault
Post Install Link to heading
After rebooting I found myself with a bootable system. That’s a good start.
Micro SD Card for home Link to heading
The first thing I did was create a new zpool for my home directory on the micro SD card.
[root]# zpool create -f -o ashift=12 shard usb-Generic-_USB3.0_CRW_-SD_201509231639-0:0
[root]# zfs create -o mountpoint=/home shard/home
[root]# zpool status
  pool: shard
 state: ONLINE
  scan: none requested
config:

	NAME                                            STATE     READ WRITE CKSUM
	shard                                           ONLINE       0     0     0
	  usb-Generic-_USB3.0_CRW_-SD_201509231639-0:0  ONLINE       0     0     0

errors: No known data errors

  pool: vault
 state: ONLINE
  scan: none requested
config:

	NAME                               STATE     READ WRITE CKSUM
	vault                              ONLINE       0     0     0
	  nvme-eui.002538415b108e66-part4  ONLINE       0     0     0

errors: No known data errors
[root]# zfs list
NAME                 USED  AVAIL  REFER  MOUNTPOINT
shard                400K   115G    96K  /shard
shard/home           100K   115G   100K  /home
vault                891M  38.6G    96K  none
vault/ROOT          65.7M  38.6G    96K  none
vault/ROOT/default  65.6M  38.6G  65.6M  legacy
vault/tmp            160K  38.6G    96K  /tmp
vault/usr            571M  38.6G   571M  legacy
vault/var            253M  38.6G   253M  legacy
Wireless Link to heading
Now that i’d rebooted I setup wireless.
[root]# wifi-menu -o
[root]# cat /etc/netctl/ramshome
Description='Automatically generated profile by wifi-menu'
Interface=wlp2s0
Connection=wireless
Security=wpa
ESSID=ramshome
IP=dhcp
Key=<Redacted>
Audio Link to heading
Setup audio:
[root]# pacman -S pulseaudio pavucontrol
Graphics Link to heading
Next I set up the intel graphic drivers.
[root]# pacman -S xf86-video-intel mesa-libgl lib32-mesa-libgl
xf86-input-driver:
There are two options, xf86-input-evdev and xf86-input-libinput.
Libinput is better with laptops (supposedly).
[root]# pacman -S xf86-input-libinput
Xorg Link to heading
Install xorg and xinitrc
[root]# pacman -S xorg-server xorg-xinit
xorg config Link to heading
With Intel Graphics the configuration is very simple. While xorg might work without configuration, more advanced settings require a small configuration file.
[root]# nano /etc/X11/xorg.conf.d/20-intel.conf
Section "Device"
  Identifier  "Intel Graphics"
  Driver      "intel"
  Option "AccelMethod" "sna"
EndSection
Copy xinitrc config
[john]$ cp /etc/X11/xinit/xinitrc ~/.xinitrc
Edit xorg config to start a desktop environment or window manager. I prefer openbox.
[john]$ nano ~/.xinitrc
# Defaults...

exec openbox-session
Start xorg in “/.bash_profile” for bash, or “/.zlogin” for zsh.
[[ -z $DISPLAY && $XDG_VTNR -eq 1 ]] && exec startx
If you want to auto-login at boot, you can add a dropin file with the following (replace user with actual username). Keep in mind this is not secure at all and will log you in without a password.
[Service]
ExecStart=
ExecStart=-/usr/bin/agetty --autologin user --noclear %I $TERM
Window Manager/Desktop Environment Link to heading
I prefer just using openbox, but any window manager or desktop environment will do.
[root]# pacman -S openbox
I elaborate on the process of setting up openbox in my previous post about using it on Arch Linux.
Screen DPI Link to heading
We can increase the screen DPI to a usable level.
We know the display specs:
“12.3 inches (31 cm) 2736x1824 (267ppi) Pixel Sense display with 3:2 aspect ratio”
Display size and DPI are sometimes not detected correctly. We can set them explicitly.
Calculate screen height and width: 292.10 x 201.42
[root]# echo 'scale=5;sqrt(2736^2+1824^2)' | bc
3288.26276
[root]# echo 'scale=5;(12.3/3288*2736*25.4)' | bc
259.90905
So the screen is 292.10 x 201.42
Create a config file for xorg
[root]# nano /etc/X11/xorg.conf.d/90-monitor.conf
Section "Monitor"
    Identifier             "Monitor0"
    DisplaySize            292 201    # In millimeters
EndSection
Install xrandr and add ‘xrandr’ –dpi 192’ to xinitrc
[root]# pacman -S xorg-xrandr
[john]$ nano ~/.xinitrc
# Defaults...

xrandr --dpi 192
exec openbox-session
and add ‘Xft.dpi: 240’ to Xresources
[john]$ nano ~/.Xresources
Xft.dpi: 192
Conclusion Link to heading
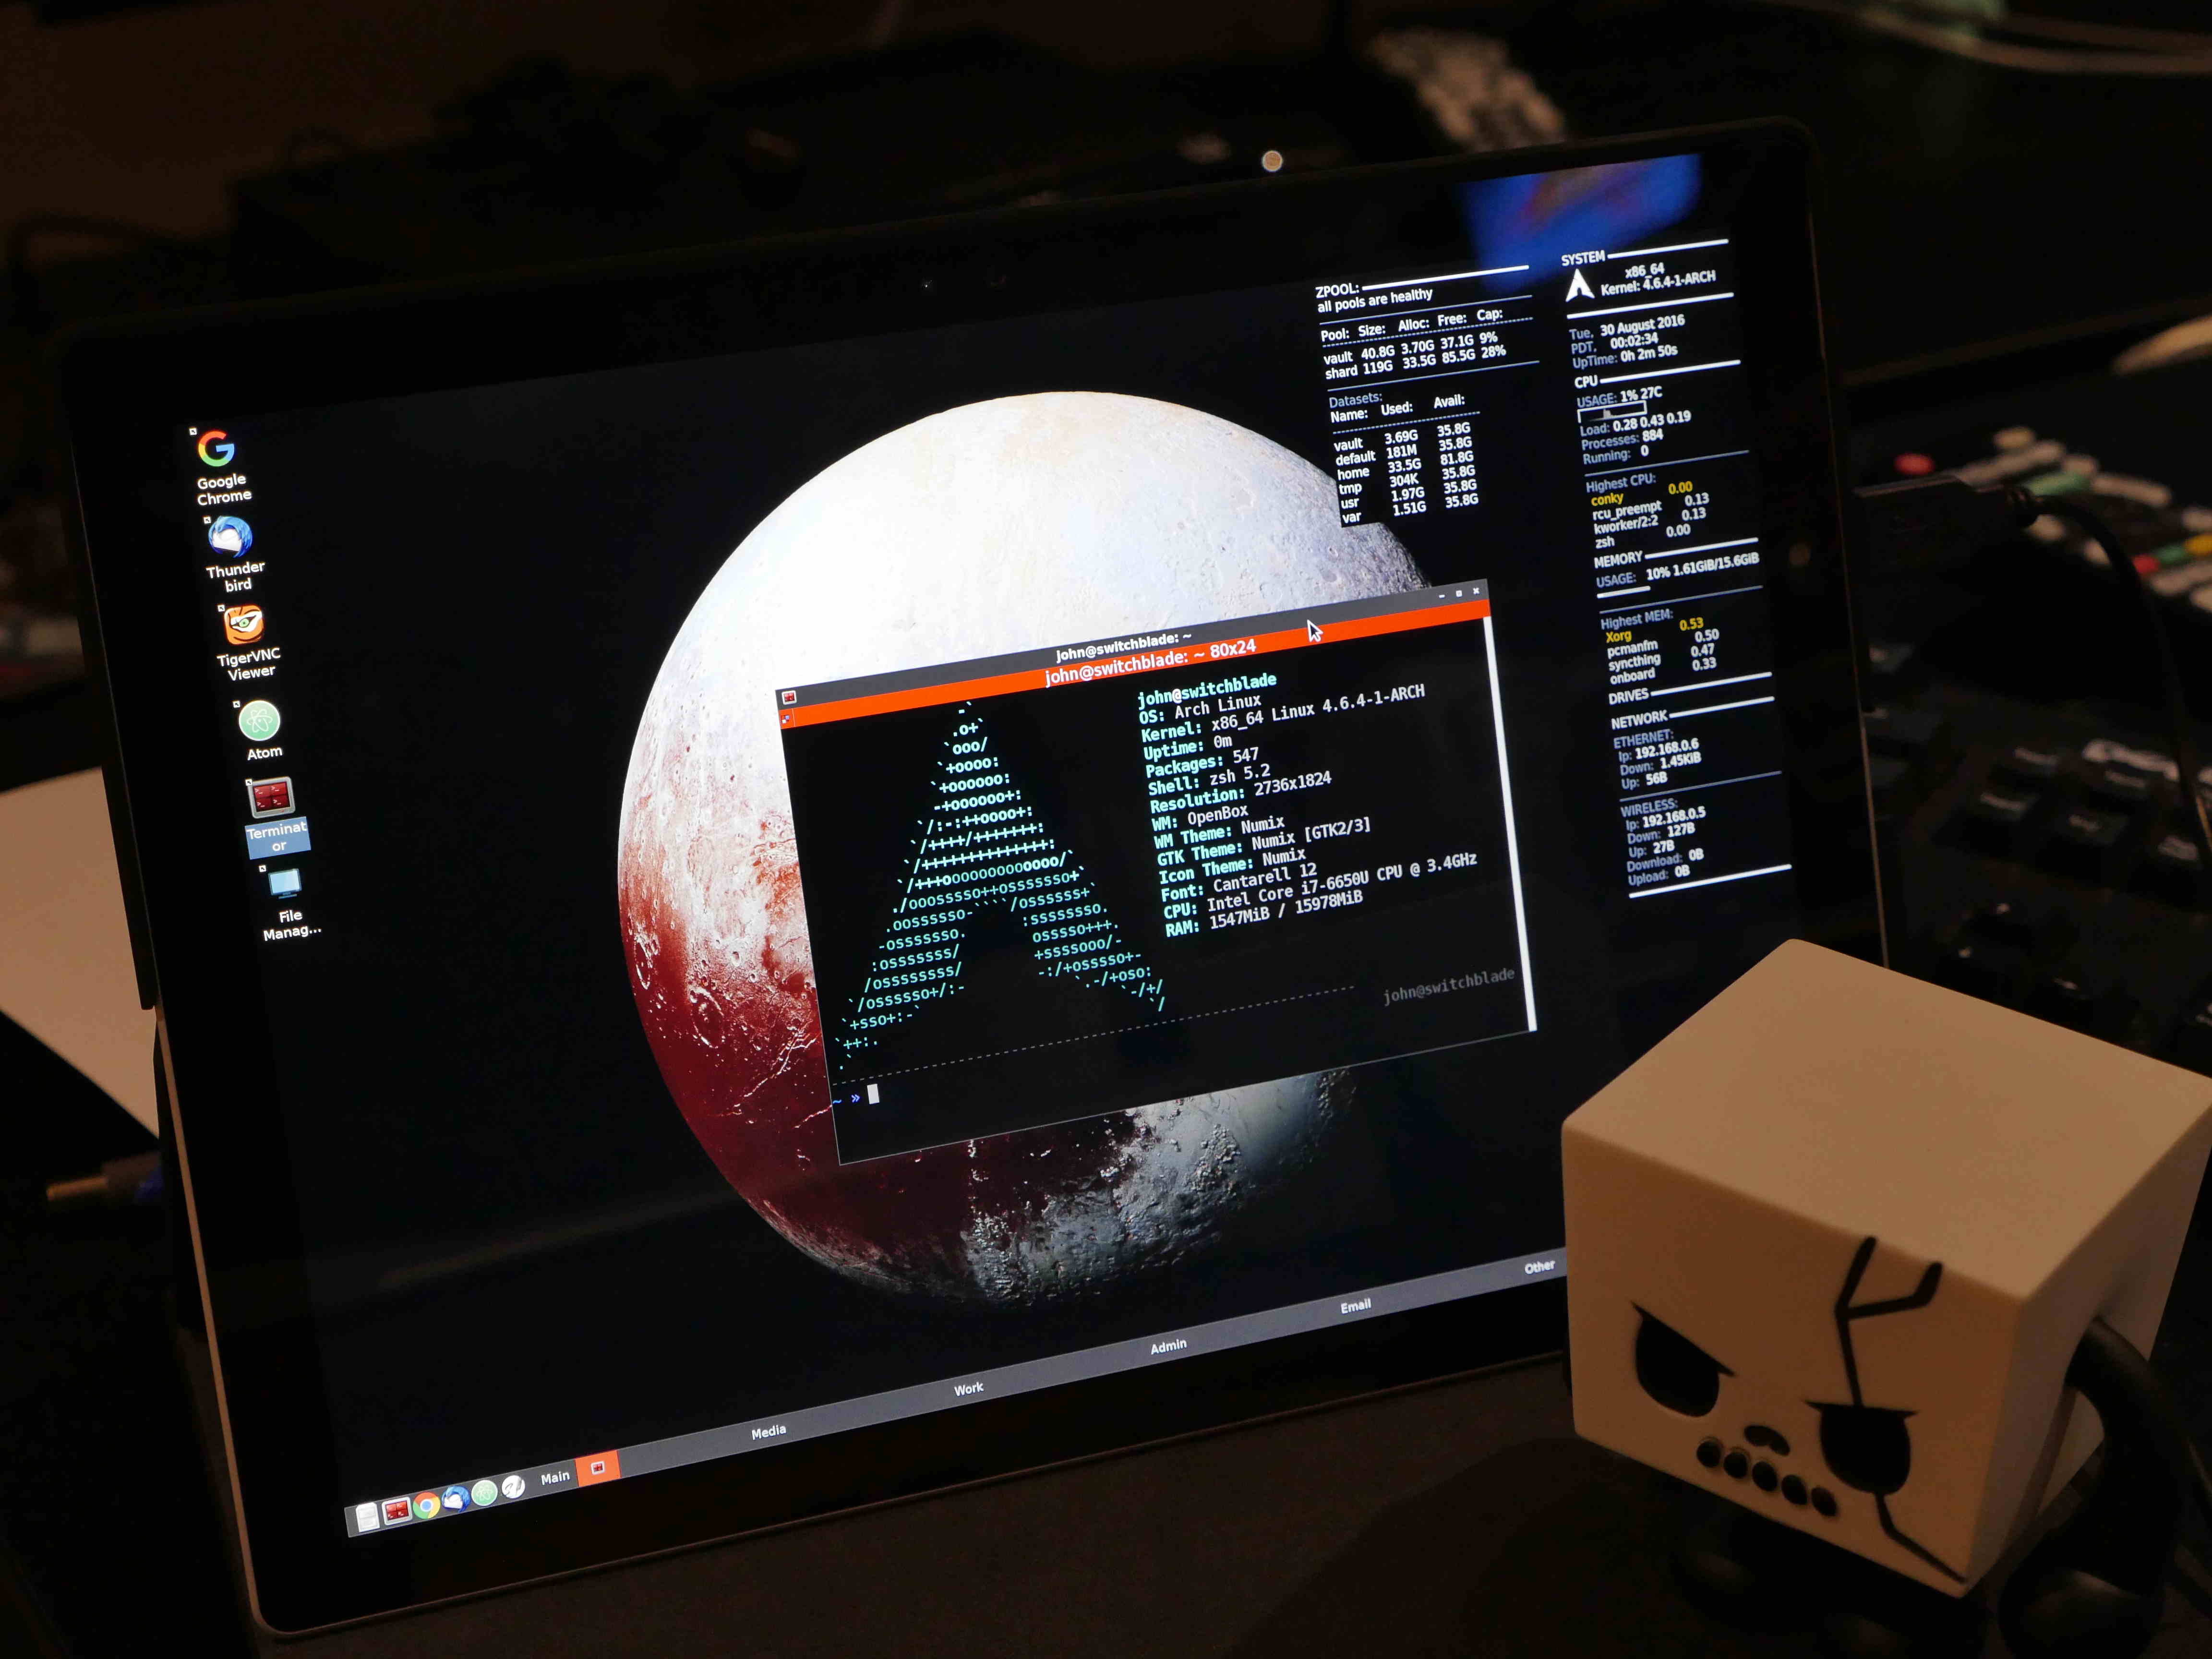
At this point I had a working Archlinux install on my Surface 4 Pro with a simple openbox setup.
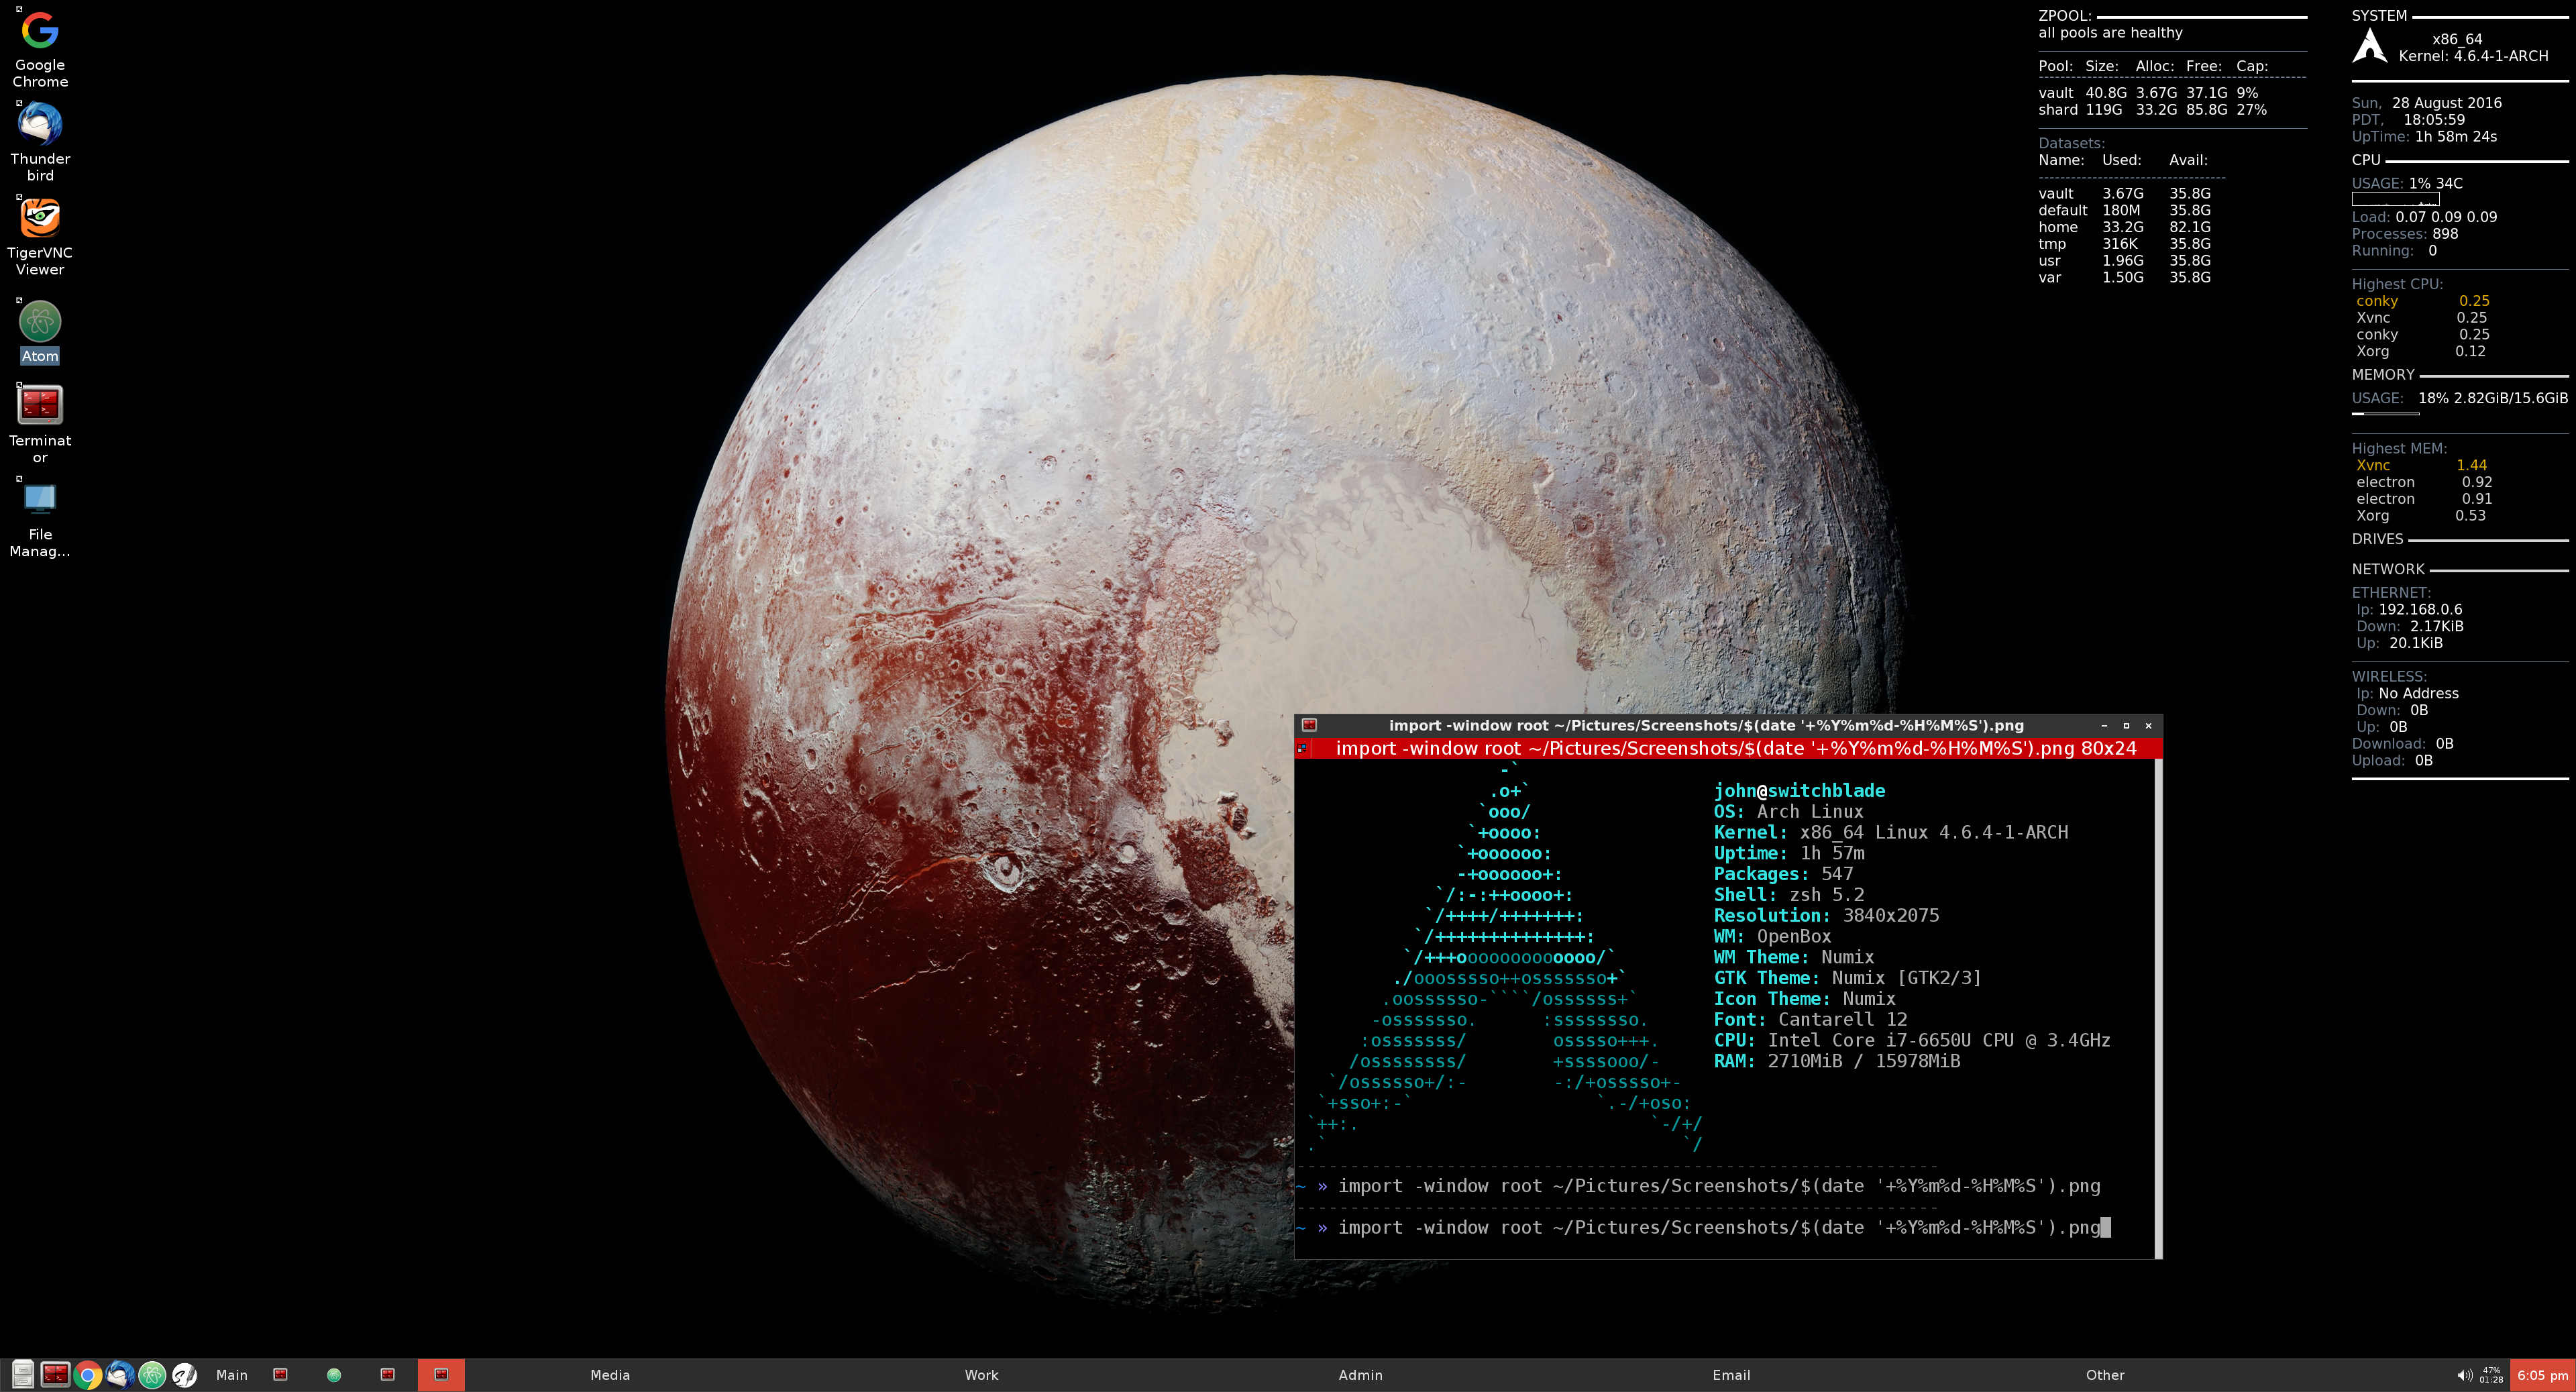
There’s still a lot to set up to make it a working laptop, but from here on out most of it is configuration based on preference. One thing I found after setting up openbox is that, with the high DPI display, it is almost unusable due to the tiny font. Because of the small screen, you need to do some configuration to change the DPI settings. After figuring out how to increase the display size, it is noticeable how beautiful of a display it is.
Unfortunately I was unable to get the touchscreen working. I’m hoping a future kernel update will allow me to use it, as that seems to be what happened with previous Surfaces. Other than the touchscreen, everything seems to be working as expected.
Something that sets the Surface apart from other popular tablets, is that it doesn’t artificially limit your capabilities. If you want to use it as a laptop, or install alternate operating systems on it, you are free to do so. I think the Surface is going to make a great Linux laptop, and I look forward to spending some time playing with it.