In the past month or so I have been putting together my own desktop environment starting with Archlinux and openbox and piecing all the different parts together to make a proper desktop environment. Building a desktop this way really follows the Unix methodology, have a bunch of programs that each do one thing well, and when you put them together you end up with something amazing.
Most of my time spent using Linux has been spent in the KDE environment, and while I love KDE, since the changes introduced in plasma 5 my environment has been fairly unstable. Initially I thought my install had somehow gone wrong and I attempted to reinstall Archlinux but after a little while I started noticing crashes again. While the plasma shell is very good about restarting, I’ve also experienced crashes where the shell does not restart and I’m stuck having to reboot. This can be acceptable when experimenting or when time is available to fix a problem, but when your desktop starts to hamper your workflow, it can be very frustrating.
Upon deciding something needed to be changed I was left with a few choices, return to KDE 4, try one of the other desktop environments such as XFCE, or LXQT, or do something I had been considering for awhile, set up a custom desktop from scratch just starting with a window manager.
I ended up going the route of building something up from scratch using Openbox as a base. At this point I have a fast, lightweight environment that is extremely stable and is truly my desktop as I have built it from the ground up choosing every application. The experience is also given me a bit of a peek into what makes up a desktop environment and what projects like KDE, gnome and others end up going through to build their desktop environments.
Note: I did this experiment using Archlinux as that is my distribution of choice however the same should follow on any distribution where you can find the same packages.
Window Manager Link to heading
Following the normal Arch Linux install procedure the first thing we will do is install the window manager openbox. I experimented with a few window managers such as awesome, i3 and other tiling window managers, however I happen to prefer the floating window paradigm and thus ended up on openbox.
The other possible contender that would be interesting to try would be fluxbox which is another floating window manager option. I chose openbox over fluxbox partly due to the fact that openbox is used everywhere and thus there is a plethora of information out there about customizing it. I also didn’t like the dock that fluxbox started with and I really wanted to piece together all of the different parts of the desktop myself. While my choice was openbox, a lot of the customizations used apply to fluxbox in the same way.
For our window manager to show up it needs to be added to either a login manager or a user’s “~/.xinitrc” file. There is a default version of the script that contains some code we want to retain, so rather than making it from scratch it is advised to copy the default script to the user’s home directory.
Copy default xinitrc to users home folder.
cp /etc/X11/xinit/xinitrc ~/.xinitrc
After adding the command exec openbox-session to the end of the “~/.xinitrc” file, an openbox session should be able to be started by entering the command startx.
Openbox can also be automatically started upon login by the shell’s startup script.
Add exec startx to shell’s startup script: “~/.bash_profile” for bash, or “~/.zlogin” for zsh.
[[ -z $DISPLAY && $XDG_VTNR -eq 1 ]] && exec startx
Configuring Openbox Link to heading
Setting up and using open box is quite simple, four files are used; “autostart”, “environment”, “menu.xml”, and “rc.xml”. These files control everything about the window manager .
- autostart - Contains a list of the applications to run on startup.
- environment - System-wide environment variables can go here.
- menu.xml - Describes the right click menu.
- rc.xml - The main configuration file, contains keybindings, themeing virtual desktop settings and more.
These files should be placed in “~/.config/openbox” for user configuration. The global profile can be found at “/etc/xdg/openbox”, it is well documented and copying the global configuration to the users openbox directory will give up good place to start customizing from.
Copy openbox configuration files to users directory.
cp -R /etc/xdg/openbox ~/.config/
It is possible to edit these by hand however graphical tools are available and a few key ones will probably be desired.
Themes and Appearance Link to heading
obconf and lxappearance-obconf can be used to configure themes and appearance. Any gtk theme should work and there are quite a few in the openbox-themes package, however, getting a few theme and icon packs is probably a good idea. My personal favorite that I use is numix-themes and numix-icon-theme-git (AUR).
Note, the following are the names of the packages found in Archlinux, the package names may differ in other distributions. The same format “<packagename>” will continue for the remainder of this post.
obconf- The Openbox Configuration Manager, can be used for general configuration.lxappearance-obconf- The lxde Openbox Configuration Manager can be used to configure themes and other general customizations/lxinput- Can be used to configure mouse and keyboard, allows mouse speed and acceleration to be adjusted.obkey (AUR)- Allow setting of keybinds.
In order to see changes after editing a configuration file, open box needs to be refreshed. This can be done with the reconfigure command.
Reconfigure openbox.
openbox --reconfigure
Menus Link to heading
Right clicking on the screen opens a menu filled with applications. This is the example configuration menu menu and unless the applications listed have been installed, the menu will not function.
{% include centered_caption_image.html url="/images/openbox-configuration/openbox-default-menu.png" description=“openbox default menu.” %}
Static vs Dynamic Link to heading
There are a few different options for setting up menus but the main two categories are static and dynamic. Static menus are hard coded in XML and will require going into the configuration file and editing it to add a new application every time one is installed. This is a viable solution if applications are not being installed on a common basis. Dynamic menus are akin to what is in the menus of most desktop environments where applications show up in the menus automatically. If applications are going to be installed on a common basis this will probably be the preferred choice.
Static Menu Link to heading
Openbox menus start with the opening tag <openbox_menu> and are made up of series of menus and items. These menus can be nested and can contain commands to execute, as well as applications to run.
Openbox configuration file “menu.xml” example.
<openbox_menu xmlns="http://openbox.org/3.4/menu">
    <menu id="apps-accessories-menu" label="Accessories">
        <item label="Calculator">
            <action name="Execute">
            <command>gnome-calculator</command>
            <startupnotify>
                <enabled>yes</enabled>
            </startupnotify>
            </action>
        </item>
        <--- Other items --->
    </menu>
    <--- Other menus --->
</openbox_menu>
The process of making these menus can be automated using a static menu generator and edited with obmenu. They will generate menus based on installed applications by looking in certain directories.
Static Menu Tools:
menumaker- Heuristics-driven menu generator.archlinux-xdg-menu- Automatically generate menu’s from xdg files.obmenu- Openbox menu editor.
Dynamic Menu Link to heading
Dynamic menus are my preferred choice and give the same kind of functionality most people are used to. They can be used to generate full, complex menus on the fly.
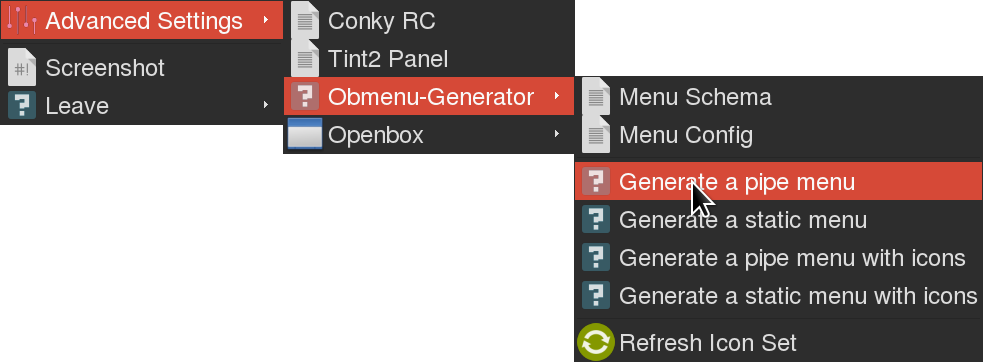
One of the more popular ones is obmenu-generator (AUR), it is not officially connected to open box but it is widely used and can be found in the arch user repository. Whenever a menu is opened, the applications update, this is nice because it is a set it and forget it solution that requires little to no maintenance.
{% include centered_caption_image.html url="/images/openbox-configuration/obmenu-gen/settings-menu.png" description=“Obmenu-generator generated menu.” style=“width:313px;height:338px;” %}
In order to have obmenu-generator (AUR) make a menu on demand when the menu is opened, the following should be placed inside the <openbox_menu> tags in “menu.xml” as the only entry.
<openbox_menu xmlns="http://openbox.org/" xmlns:xsi="http://www.w3.org/2001/XMLSchema-instance" xsi:schemaLocation="http://openbox.org/">
    <menu id="root-menu" label="obmenu-generator" execute="/usr/bin/perl /usr/bin/obmenu-generator -i" />
</openbox_menu>
The configuration files for obmenu-generator (AUR) are “schema.pl” and “config.pl”, they can be found inside the directory “~/.config/obmenu-generator”. The schema and config files are documented or fairly self-explanatory and can be configured with menus and sub menus in order to organize applications.
Obmenu Generator Schema:
Items
- At it’s simplest “schema.pl” starts with
our $SCHEMA = [and contains a list of items:
- At it’s simplest “schema.pl” starts with
    require "$ENV{HOME}/.config/obmenu-generator/config.pl";

    ## Text editor
    my $editor = $CONFIG->{editor};

    our $SCHEMA = [

        #          COMMAND                 LABEL                ICON
        {item => ['xdg-open .',        'File Manager',      'file-manager']},
        {item => ['terminator',         'Terminal',          'terminal']},

        # Continued...
    ]
- These items form a list of selectable applications or commands. The code above generates the top of the menu shown in the above image.
Categories
- There are also keywords which will expand into lists of applications in a category:
    # Application Categories
    {sep => 'Categories'},

    #          NAME            LABEL                ICON
    {cat => ['utility',     'Accessories', 'applications-utilities']},
    {cat => ['development', 'Development', 'applications-development']},
    {cat => ['education',   'Education',   'applications-science']},
    {cat => ['game',        'Games',       'applications-games']},
    {cat => ['graphics',    'Graphics',    'applications-graphics']},

    # Continued...
Submenus
- Submenus can be added, which can then be nested:
    ## Custom advanced settings
    {sep => undef},
    {begin_cat => ['Advanced Settings', 'gnome-settings']},

        # Configuration files
        {item => ["$editor ~/.conkyrc",              'Conky RC',    'text-x-source']},
        {item => ["$editor ~/.config/tint2/tint2rc", 'Tint2 Panel', 'text-x-source']},

        # obmenu-generator category
        {begin_cat => ['Obmenu-Generator', 'menu-editor']},
            {item => ["$editor ~/.config/obmenu-generator/schema.pl", 'Menu Schema', 'text-x-source']},
            # More items...
        {end_cat => undef},

        # Openbox category
        {begin_cat => ['Openbox', 'openbox']},
            {item => ['openbox --reconfigure',               'Reconfigure Openbox', 'openbox']},
            # More items...
        {end_cat => undef},

    {end_cat => undef},
    {sep => undef},
Commands
- Since openbox menus can be commands in addition to applications, commonly used commands can be added as menu options. In my menu I have a screenshot command, as well as restart, shutdown, and lockout commands.
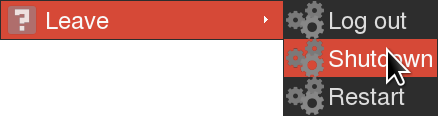
- Add a “Leave” category with three command items.
    # Exit category
    {begin_cat => ['Leave', 'leave']},
        #          COMMAND                 LABEL                ICON
        {item => ['openbox --exit',      'Log out',      'system-run']},
        {item => ['systemctl poweroff',  'Shutdown',      'system-run']},
        {item => ['systemctl reboot',    'Restart',       'system-run']},
    {end_cat => undef}
Panels and Taskbars Link to heading
While a menu is enough to get by , most people will want to use a panel or taskbar such as the one xfce uses, xfce4-panel, or the simple and customizable tint2.

tint2 is a great choice as it follows in the openbox spirit of having easily customizable tools with plain text configuration files. Like a lot of the other open box compatible applications, it is possible to both use graphical tools to customize the panel as well as go right down into the text file and edit it. This also means it’s easy to pick up your configuration file and move it to another computer, or restore an old configuration since it’s as simple as pasting a text document in the right place. tint2 can also have sections for each individual desktop and has various small widget like programs that can be used with it such as a calendar, gsimplecal, a volume application, volumeicon, and a mini task tray.
File Manager Functionality Link to heading
There are several file managers that fit well in an open box install and some that do not. Some file managers are deeply integrated into an entire desktop environment and when downloaded end pulling down multiple dependencies. This is obviously not preferable as part of the reason someone might make an openbox install would be too build a lightweight desktop. The best file manager, in my opinion, for accomplishing what we need is pcmanfm. pcmanfm is a fast and lightweight file manager with network and trash support, it also ends up having some bonus functionality that will be very useful. Another good alternative is thunar, but I found pcmanfm to be the better option.
Strangely, pcmanfm can also manage desktop wallpaper and icons, while This isn’t normal file manager functionality, it does mean it’s not necessary to download another tool which is nice.
In order to have pcmanfm manage the desktop, it should be started in desktop mode in the “autostart” file.
Start pcmanfm in desktop mode.
pcmanfm --desktop &
There are other stand-alone tools to manage the desktop and wallpaper, such as nitrogen or feh, incase pcmanfm is not used as the file manager.
Trash and Drive Management Link to heading
In order to use many of the functions that are in file managers it is necessary to have a a few additional programs. gvfs gives you the ability to mount volumes and have trash control. It is not mandatory to have, but it allows on demand mounting to be done completely within the file manager, as opposed to having to drop down to the command line. A volume manager such as udisks2 will also be wanted, and for automounting removable disks, udiskie works well with openbox. udiskie can be added to openbox’s autostart file like any other application.
gvfs- volumes and have trash controludisks2- Automatic mountingudiskie- Removable disk automounter using udisks
Compositor Link to heading
A compositor is an optional component of an open box setup, it can give a few niceties that such as transparency, and fading by buffering the input off screen before displaying it. Openbox does not have a built-in compositor but there are a few good options that work nicely with it. The one I’ve been using, and have been quite happy with is Compton. It has sane defaults that will work with little or no manual configuration, but at the same time it has lots of different configuration options if you decide to customize the setup.
Compton can be tested by simply running compton in an active openbox session. If the defaults are acceptable it can be started in the openbox autostart file.
Run Compton in the background with shadows.
compton -b -c &
Run with a configuration file.
compton --config "~/.config/compton.conf"
Final Thoughts Link to heading
While setting up my desktop using openbox ended up being more work than it would have been just using a pre-made desktop environment, the end product has ended up being the most stable desktop I have used thus far. I also know exactly what is running on my system, and that my system isn’t cluttered with applications I will never run.
While it might not be for everybody having to configure every little bit of the desktop, I truly feel I have ended up with a great user experience, and a system that is customized exactly to fit my needs.